
(date: 2024-12-29 07:06:10)
date: 2024-12-28, from: Richard Murray’s blog
The parcel arrives, Doctor Whaaaa!, PTZ app hack, Lucy’s Lousy Light, Centralised repositories, Cold.
https://heyrick.eu/blog/index.php?diary=20241228
date: 2024-12-28, from: Icon Bar, RISC OS News
And a final treat from Gerph….
http://www.iconbar.com/comments/rss/news2151.html
date: 2024-12-27, from: Richard Murray’s blog
Celebrations chocolates, The maths of raycasting - part three, The Awakening of Omniscient.
https://heyrick.eu/blog/index.php?diary=20241227
date: 2024-12-27, from: Digital Antiquarian
The Voyage of Magellan, Chapter 21: Philippine Vagabonds I hope you’re all having a great holiday season. There will go one extra week before the next article here, folks, as I ease myself out of holiday mode. ;)
https://www.filfre.net/2024/12/this-week-on-the-analog-antiquarian-2/
date: 2024-12-27, from: Icon Bar, RISC OS News
A festive coding treat from Paolo (and definitely something to try in 2025).
http://www.iconbar.com/comments/rss/news2155.html
date: 2024-12-27, from: Icon Bar, RISC OS News
Some things we noticed this month. What did you see?
http://www.iconbar.com/comments/rss/news2135.html
date: 2024-12-26, from: Icon Bar, RISC OS News
Many thanks to Gerph for sending this item as well (and a nice reveal). It’s not too late to send us yours….
http://www.iconbar.com/comments/rss/news2148.html
date: 2024-12-26, from: Computer ads from the Past
and a Happy New Year
https://computeradsfromthepast.substack.com/p/merry-christmas-2024
date: 2024-12-25, from: Richard Murray’s blog
Merry Christmas, Freezer, Wages, Right-wing madness, Dora Advent Calendar, The Parcel scam, The maths of raycasting - part two.
https://heyrick.eu/blog/index.php?diary=20241225
date: 2024-12-25, from: Old Ventage Computing Research
A merry Christmas and happy holidays from the Southern Hemisphere, where it’s our year to be with my wife’s family in regional New South Wales, Australia. One of my wife’s relatives had an “old Commodore” in their house and asked if I wanted it. Stupid question, yeah?


The magazine and software box was what attracted my eye first, because a fair bit of it wasn’t anything I’d ordinarily encounter in the United States. This computer seemed to have been bought relatively late in the C128 lifecycle based on chip dates (we’ll get to that) and the magazines correspond to that era, all copies of The Australian Commodore and Amiga Review published from 1983 to 1996. The issues here date from
4/89, 5/89, 6/89, 10/89, 11/89, 12/89, 2/90, 3/90, 4/90, 5/90, 6/90, 8/90, 9/90, and the 1990 Annual with an extensive list of Australian BBSes, software packages and user groups. By this time the Commodore 8-bits were past their prime compared to their 16-bit Amiga brethren, but there was still some decent coverage of the 64 and 128 in this set. Unlike most American Commodore magazines, there was little type-in content, at least in these particular issues; the ones here concentrate more on reviews and product announcements with sidecar tips and tricks.
The other bit of literature in the box was a 1987-88 Dick Smith Electronics catalogue. If you’re on one of the other continents, DSE was approximately Australia’s equivalent of Radio Shack and at its peak sold a similar range of rebadged products and electronics. It is likewise no more (shut down in 2016), though its name lives on as a zombie Kogan brand; today its closest domestic equivalent would probably be Jaycar.

Like Tandy Radio Shack, Dick Smith’s typical MO was to rebadge existing products rather than engineer new ones if the company could possibly avoid it. Dick Smith’s computer and computer-adjacent selection around this time included a smattering of relabeled VTech computers and toys such as the Type-right and Whiz Kid.

However, DSE also sold a number of Sharp pocket computers directly as Sharp systems (unlike Tandy, which rebadged them also). The PC-1360 and PC-1401 were more advanced than Tandy’s Sharp rebadges, but they did include the lowend PC-1246 (Tandy PC-8, which avoided being the worst Tandy Pocket Computer ever because of the execrable PC-7) and even lower-end PC-1100, a flip-face unit that had a narrower but 2-row display and basic organizer functions, and sold for more likely because of it. DSE also sold the excellent Sharp CE-126P, a lovely device that combines a thermal printer and cassette interface yet does not rely on the sure-to-fail NiCad batteries other such peripherals did to their detriment. Tandy never sold this unit, rebadged or otherwise.

But just like the Tandy Color Computers, Dick Smith was still selling their range of 8-bit home computers as well in those days. The last of this line was the Z80-based VZ300, yet another VTech rebadge, and had a whole assortment of peripherals including memory expansion, floppy disk drive (three times the cost of the computer), and interfaces for the joysticks, cassette, printer and disk drive — which was sold separately from the disk drive! I have a VZ300 and some upgrades I need to finish building which will be in a future article.

The boxed software assortment was more typical and almost all of these would be known to a Stateside audience. The previous owner really liked his MicroProse games, so there was Gunship, Red Storm Rising and Airborne Ranger; from Activision was Fighter Bomber, Big Trouble in Little China, The Last Ninja, Galactic Games, X-15 Alpha Mission, Labyrinth and Firetrap; and also Berkeley Softworks’ GEOS 128, Broderbund’s The Print Shop and Where In The World Is Carmen Sandiego? (complete with its 1989 World Almanac), Commodore’s own Word Machine/Name Machine and rebranded copy of Arktronics’ Jane 128, and finally Maths Mania and Let’s Make Greeting Cards.

Several of these boxed items, however, show Australia-specific labels and packaging. Questor was a major NSW games distributor for Activision, Broderbund, Telecomsoft (Rainbird/Firebird), MicroProse and Mastertronic, and the six game pack shown here was a Questor-specific budget special. However, Dataflow Computer Services Pty Ltd (also NSW) had distribution rights for Broderbund’s educational and productivity software, so The Print Shop and Carmen Sandiego came through them. Maths Mania was apparently an Irish package redistributed by Pactronics Pty Ltd in NSW, Victoria, Queensland and Western Australia.

Also in the documentation was a small Commodore product circular and a software-of-the-month membership card, which I’ve covered over the address on since the prior owner is still living there. On the back we see advertisements for the MPS-1250 printer, sold for AUD$525, or in 2024 Australian dollars about A$1400 (roughly US$875 at today’s spot rate); the 1802 monitor, a rebadge of the cursed and poor quality CM-141 which we had the displeasure to have owned until it crapped out, offered at A$499 [A$1325, US$825]; and the deluxe 1084 monitor suitable for the Amiga, 64, 128 and CGA PCs at A$699 [A$1850, US$1150]. Notice the 1802 and MPS-1250 are exactly the peripherals we have here!

Australia’s Commodore pitchman at the time was John Laws, who by then was probably close to 50 years into his 71 years of national broadcasting. Best known for his extensive presence in talkback radio (talk radio to American audiences), he also endorsed products as diverse as Valvoline motor oil (“Valvoline, you know what I mean”) and Oral-B toothbrushes. In his hand here he holds a Commodore credit card. He retired from his final posting at 2SM in Sydney about a month ago (November 2024).

Three special combo packs were advertised inside the circular. The premier one was of course the Amiga 500 Pack, provided with 512K RAM, Textcraft Plus and an A520 RF modulator. This sold for A$999 [A$2650, US$1650]. Despite Commodore’s best efforts, though, its financial anchor continued to be the computer it was trying its hardest to kill off: the C64. The Commodore Pro Pack had a Commodore 64, 1541 disk drive, GEOS, joystick, and 15 educational, games and utility programs for A$699 [A$1850, US$1150]. A second “Pro Pack Plus” added an MCS-810 printer, 1351 mouse (for which GEOS had a driver) and ten more software packages for an additional A$499 [A$1325, US$825].

The membership card was for the Island By Mail Software Club, out of Werribee, Victoria, which in addition to member hardware sales provided public domain software on floppy disk and a catalogue, also on floppy disk. I’ll likely end up imaging some of these. A number of Ocean Software games like Total Recall, Golden Axe and Super Off Road were on separate floppies in the disk box plus an Atarisoft Battlezone cartridge.

Well, let’s get it unpacked.

Unfortunately this machine, printer, monitor, main system and keyboard alike, apparently spent a lot of time in the NSW sun because it ended up jaundice yellow — the disk drive lever was up long enough that the only beige portion of the front case was what it was covering. I sense some Retr0brighting in this system’s future.

The monitor powered on (I’ll get to the printer in a moment) and I decided to bring it up in 128 mode first. Unfortunately there are several obvious defects: the text colour is wrong — it should be light green, like the border — and the characters are flickering with other darker colours, and there is no READY. prompt because the computer can’t boot from its internal disk drive. The drive activity light never turns on and the drive motor never turns off.

We’ll need to get to BASIC to do a little more diagnosis since I don’t have a dead-test cartridge here, so I brought it up in 64 mode next.

It has the same problem as 128 mode although the character colour at least matches the correct colour part of the time. We’re dealing with either a VIC-IIe fault or colour RAM problem, but by this point I was leaning towards the latter since most of the system is working and a failure in the VIC would likely prevent starting up at all.

Setting every nybble in colour RAM to one (white) didn’t change anything on-screen.

The internal disk drive also failed to respond in 64 mode (I put the background colour to white so I could photograph the flickering text more easily).

Let’s make sure there’s not anything obviously wrong on the inside. We were last inside a Commodore 128DCR for a prior refurb weekend and the disassembly here is the same. With a little bit of care we can avoid tearing the intact warranty sticker here too.

Here’s the rear plate (50Hz 240V).

Overview of the mainboard. This “128D” is in fact a 128DCR too. Aside from a couple completely unsurprising cobwebs the board appears intact without obvious physical damage or deficiency. The colour RAM here is the M2128-15 at U19. This is unfortunately soldered to the board and not socketed, as most of the parts are. The disk drive issue could be either CIA 6526 #2 or some failure in the internal 1571.

Although only the four lower bits are connected to the colour RAM, those should at least be stable as we sample it, but they clearly aren’t.

For the disk drive problem, we need to see whether it can talk over the IEC serial bus at all, so let’s get out the printer. The printer has suffered the same leptospirotic fate as the other components of the system but it does power on and it does pass its internal self-test (hold down LF when turning it on). It doesn’t actually print anything on the paper but you won’t be surprised to hear the ribbon’s as long gone as Menzies and I think its electronics are just fine.

I don’t have any of these chips here and I don’t even have a proper soldering iron available on this side of the Pacific, so this will be a restoration for another day while I get everything together. But it was fun looking at the software and magazines, and I think this machine is eminently repairable. To be continued after a trip to Jaycar and some mail orders.

A very happy holiday and a merry Christmas to those of you who celebrate it.
https://oldvcr.blogspot.com/2024/12/a-mostly-merry-southern-hemisphere.html
date: 2024-12-25, from: Icon Bar, RISC OS News
Many thanks to Gerph for sending this item as well (exciting times in RISC OS development). It’s not too late to send us yours….
http://www.iconbar.com/comments/rss/news2150.html
date: 2024-12-25, from: C64 OS Blog
![]() I haven’t blogged about World of Commodore since 2019. Now, to be fair,
we did have a worldwide pandemic between then and now. In 2020 there was
no in-person event. Maybe it happened online, but I didn’t participate.
In 2021 World of Commodore happened again in the flesh, but we were all
masked up. I don’t remember much about that event. I did take lots of
photos, but I can only assume that attendance was low. I think they did
the show via Zoom in parallel with the in-person event. At this time,
C64 OS had not yet made its v1.0 debut. I was very busy preparing for
the release though. Instead of blogging I was writing the User’s Guide
both printed and digital, and trying to finish everything up in the
following 6 months. By the time 2022 rolled around, I had released C64
OS just a couple of months earlier, and my life and time availability
had been completely deranged. That was one of the busiest times I’ve
ever experienced. I was making sales every few minutes. I had a huge
backlog of . . .
I haven’t blogged about World of Commodore since 2019. Now, to be fair,
we did have a worldwide pandemic between then and now. In 2020 there was
no in-person event. Maybe it happened online, but I didn’t participate.
In 2021 World of Commodore happened again in the flesh, but we were all
masked up. I don’t remember much about that event. I did take lots of
photos, but I can only assume that attendance was low. I think they did
the show via Zoom in parallel with the in-person event. At this time,
C64 OS had not yet made its v1.0 debut. I was very busy preparing for
the release though. Instead of blogging I was writing the User’s Guide
both printed and digital, and trying to finish everything up in the
following 6 months. By the time 2022 rolled around, I had released C64
OS just a couple of months earlier, and my life and time availability
had been completely deranged. That was one of the busiest times I’ve
ever experienced. I was making sales every few minutes. I had a huge
backlog of . . .
https://www.c64os.com/post/worldofcommodore2024
date: 2024-12-24, from: RiscOS Story
You might have noticed that the recently announced new show, RISC OS North, has adopted a more modern style of website than traditional RISC OS shows, which still hold a more static, traditional design. The trend hasn’t just stopped at the website design, though; there is also now a promotional video for the event, which you might see popping up here and there – and will hopefully be seen by people beyond those who regularly come to RISC OS shows:
https://www.riscository.com/2024/promo-video-risc-os-north/
date: 2024-12-24, from: RiscOS Story
Supporting some fifteen additional games, a new version of ScummVM has arrived. The software is maintained by a team of programmers across a number of platforms, with Cameron Cawley to be thanked for his work bringing each release to RISC OS. ScummVM is a ‘virtual machine’ originally developed to allow games to be played that were based on LucasArts’ Script Creation Utility for Maniac Mansion. By effectively replacing the executable component that came with such games, which was specific to the platforms on which the games were originally released, the…
https://www.riscository.com/2024/scummvm-2-9-0/
date: 2024-12-24, from: Icon Bar, RISC OS News
Many thanks to ROOL for sending this festive item and tutorial…
http://www.iconbar.com/comments/rss/news2153.html
date: 2024-12-23, from: Linux Magazine
If you have an Apple Silicon Mac and you’re hoping to install Fedora, you’re in luck because the latest release supports the M1 and M2 chips.
http://www.linux-magazine.com/Online/News/Fedora-Asahi-Remix-41-Available-for-Apple-Silicon
date: 2024-12-23, from: Computer ads from the Past
Growing with your needs
https://computeradsfromthepast.substack.com/p/ncr-pc4i
date: 2024-12-23, from: Icon Bar, RISC OS News
A reminder that there are several shows to look forward to both in the UK and abroad next year which no doubt the press team at TIB will be covering. Be sure to book your place for new and updated RISC OS hardware and software from Elesar.
http://www.iconbar.com/comments/rss/news2154.html
date: 2024-12-22, from: Richard Murray’s blog
Big Town, The maths of raycasting - part one.
https://heyrick.eu/blog/index.php?diary=20241222
date: 2024-12-22, from: RiscOS Story
Another small update has been made to TrainTimes by its developer, Kevin Wells. The application provides a way to look up information about trains and stations, including timetable information, and so on. It does this by using Wget to communicate user input to a couple of remote websites – Real Train Times and National Rail – and processing and displaying the data that is returned. The main change to bring the software up to version 2.06 is the addition of a ‘Station Data’ entry in the Station Details window menu.…
https://www.riscository.com/2024/traintimes-2-05-released-2/
date: 2024-12-22, from: Low-tech magazine
For centuries, many cultures have used heated tables for thermal comfort in cold weather. Examples are the “kotatsu” in Japan, the “korsi” in the Middle East, and the “brasero de picon” in Spain. A heat source goes under a table, a blanket goes over it, and people slide their legs underneath. The micro-climate under the blanket keeps you comfortable, even though the space in which you find yourself is cold.
The heated table is an excellent example of our ancestors’ energy-efficient way of warming: heating people, not spaces. Historically, glowing charcoal from the fireplace heated the space under the table. While that provided sufficient warmth, it also carried a significant risk of fire and carbon monoxide poisoning. Nowadays, we can use electric heating technology instead. For example, the Japanese kotatsu is still in use, but it’s now working with a small electric heater fixed under the table surface.
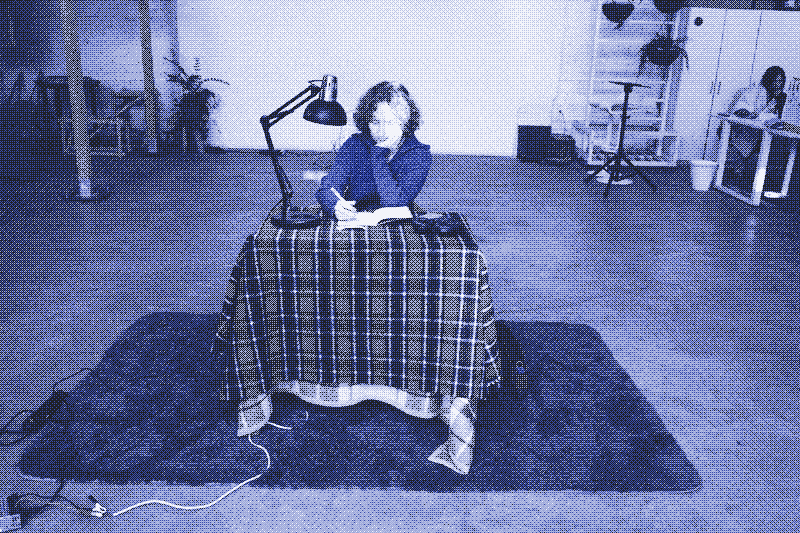
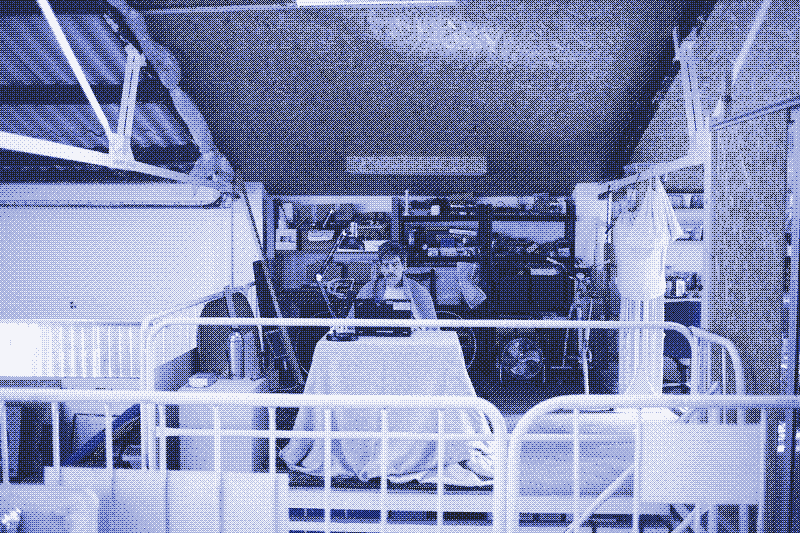
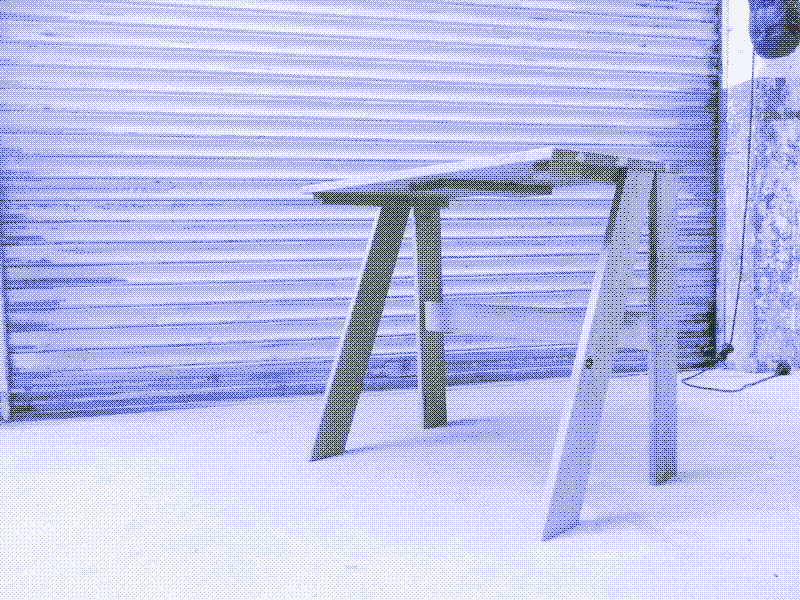
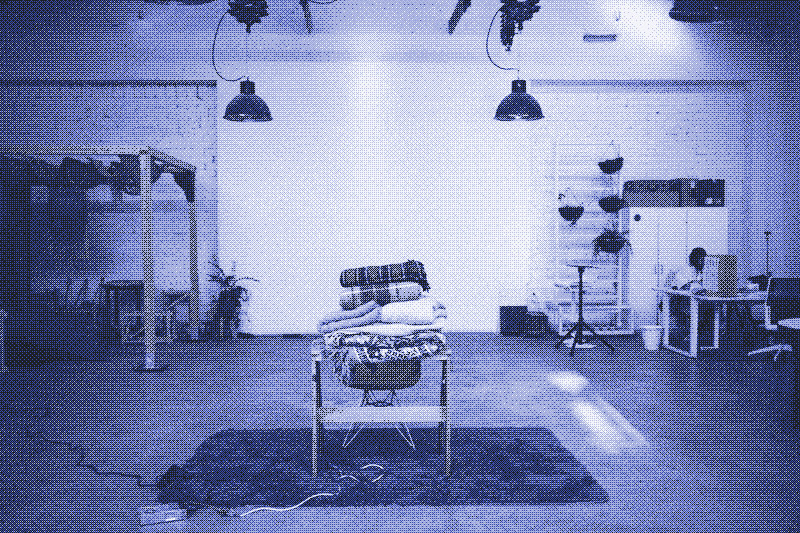
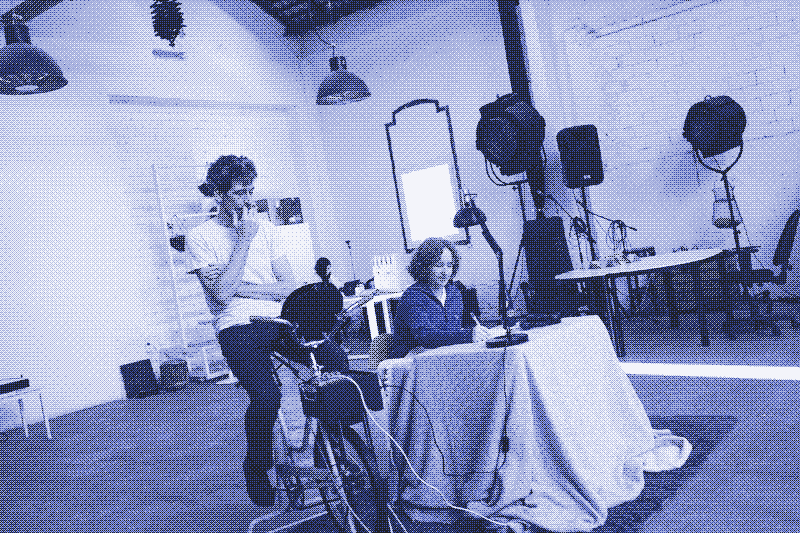
In this manual, I will walk you through the making of an electrically heated work desk for one person. I have built the table for myself in the co-working space in Barcelona where I have my office now. The building, an old industrial warehouse, has very high ceilings, no insulation, and little sun in winter. It can get very cold here and conventional heating systems don’t work. My heated table turns out to be a perfect solution. I can power it with a solar panel, a wind turbine, a bike generator, or a battery. I can also plug it into the power grid.
A heated table offers exceptional comfort. The lower part of your body gets immersed in heat as if you are baking in the sun or sitting in a hot bath. The warmth quickly spreads to the rest of your body through the bloodstream.
During a week of experiments in December 2024, with indoor air temperatures of 12-14°C (53-57°F), I recorded very low energy use for my freshly built heated table: between 50 and 75 watt-hours per hour. 1 Compare that to a conventional electric portable heater, which easily consumes 1,500 watt-hours per hour (and does not guarantee thermal comfort). My heated table uses as little electricity as charging a laptop or heating two liters of water for a hot water bottle (58 watt-hours per hour, assuming you reheat the water every two hours).
It takes about 15 minutes before the heat effect of the table becomes noticeable, one hour before it heats at full power, and two hours before it reaches its maximum energy efficiency. Energy use drops from 75 watt-hours in the first hour to between 50 and 60 watt-hours in the third hour, as the thermostat turns off the heating more often. The system accumulates heat in the carpet, the blankets, the table, and the human body. If you turn it off after three hours, walk away, come back 30 minutes later, and turn it on again, the table is heating at maximum capacity within 10 minutes.
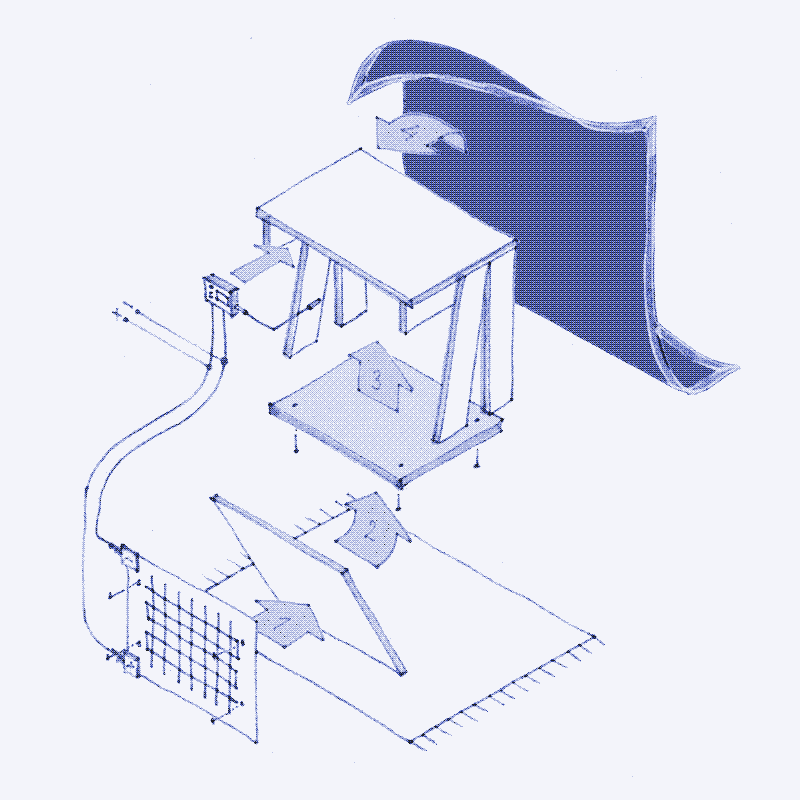
Building an electrically heated table is quite a simple project, which requires few technical skills and little time. Once you get all the parts together, you can assemble a heated table in a few hours. The costs are limited, too. 2 The construction process consists of three parts: wiring the electrical system, programming the thermostat, and getting the textile layers and insulation right.
What you need:
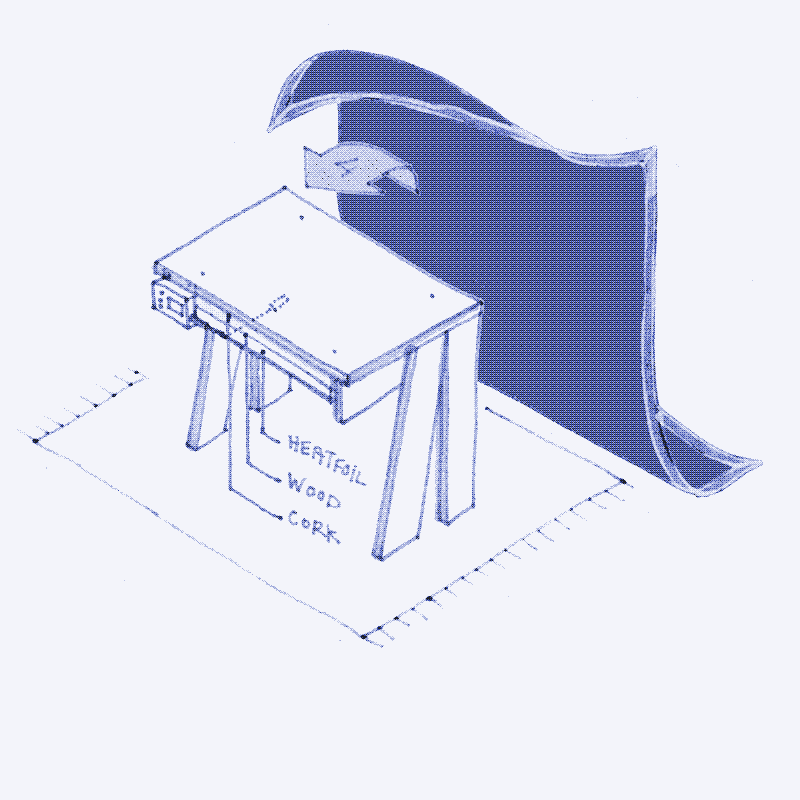
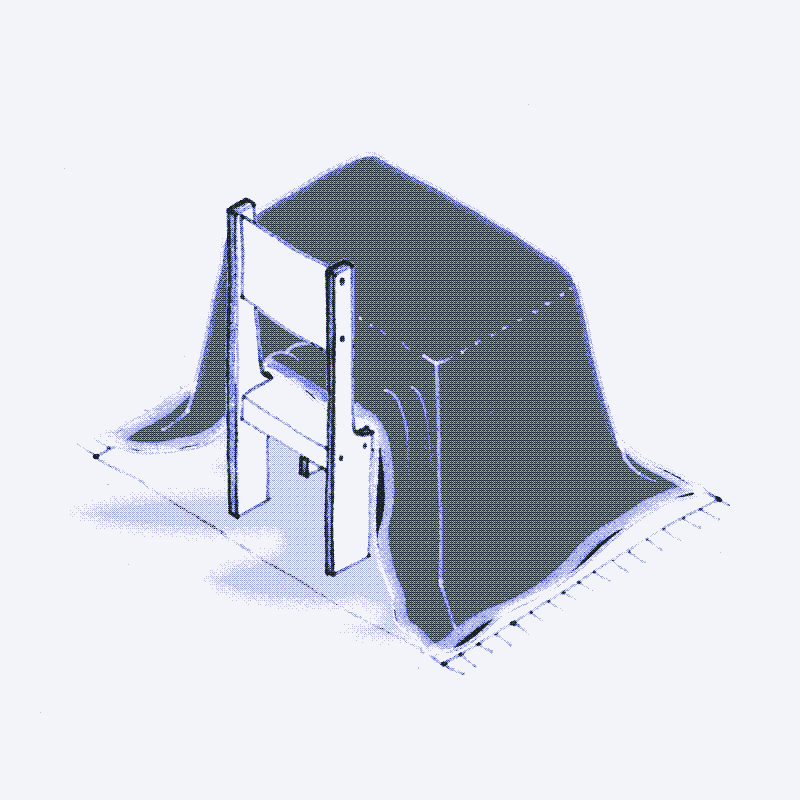
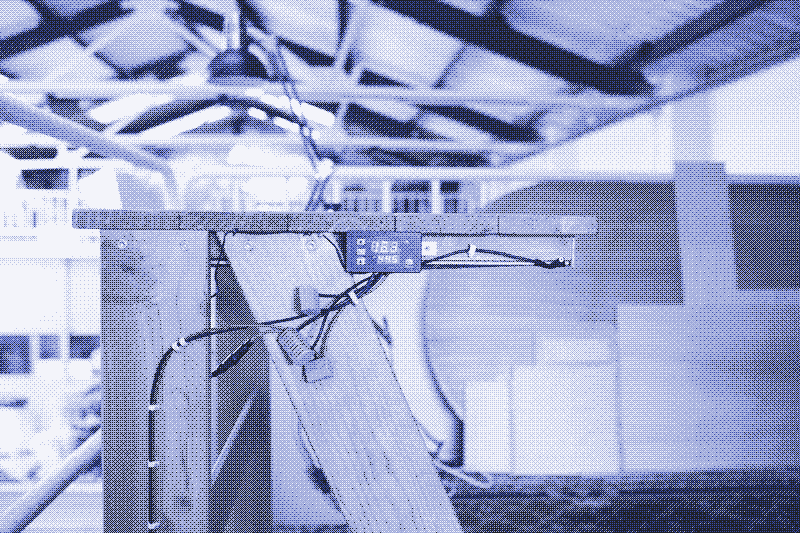
This manual concerns a table for only one person - my writing desk. Unlike the Japanese and Middle Eastern examples, my table is adapted to a Western-style sitting position: not on the floor but on a chair. You can turn any table into a personal heat source, but some are better suited than others. Most importantly, you should be able to screw a flat heating foil (step 2) under the table. However, structural elements may complicate that, as is the case for my table (see the image below).
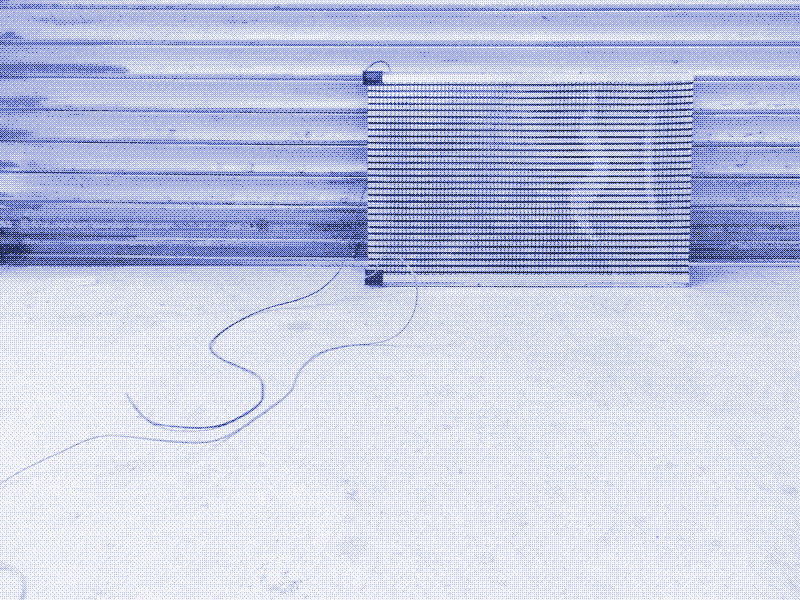
I solved this by installing the heating foil on a thin wooden board which I then screwed against the supporting elements. However, for some other tables, this may not work. Choose a wooden table. Wood insulates relatively well, so a wooden table top already provides some of the insulation you need to maximize heat production. It’s easy to screw things onto a wooden table as well.
You can build a larger heated table that can seat more people, but in that case, you will have to connect several heating foils (step 2) and stitch several blankets (step 8) together. Low-tech Magazine will build a large heated table for several people during a workshop in Barcelona on January 25, 2025.
In principle, any electric heating device can power a heated table. However, because a heated and insulated table is so energy efficient, you need an electric heater with a very low power use. The average portable electric heater is way too powerful for our purpose. Due to its high surface temperature, it could also cause burns or provoke a fire when you put it under a table.
The best heating element for an electrically heated table - and the one I am using in this manual - is carbon or infrared heating film. These very thin heating foils are primarily meant for electric floor and wall heating in buildings and vehicles, for protecting batteries or water tanks against the cold, or for warming beehives and terrariums. Infrared heating films are low-temperature, large-surface heaters, so there’s no risk of burns or fire through direct contact with skin or clothes. They are meant to operate at a maximum temperature of 40-45°C (104-113°F).
Carbon heating foils come in different voltages: 12V, 24V, and 110/220V. I chose a 12V heating foil to make my table compatible with my 12V solar installations and bike generator. If you have a 24V renewable power system, opt for a 24V heating foil.
If you want to plug the table into a wall socket, using mains power, there are two options. First, you could buy a 110V/220V heating foil, add a compatible plug, and connect it directly to the power socket. However, you really need to know what you are doing, because such high voltages carry the risk of electrocution. A safer DIY option is to use a 12V or 24V heat foil connected to a universal power adapter that steps down the voltage from 220V to 12 or 24V (comparable to the charger of a laptop). That is how I tested the table because I don’t have solar panels in my new office yet.
Carbon heating film is available in different widths, for example, 20, 30, or 50 cm. You can buy it per running meter, and it’s flexible enough to be rolled up tightly for transport and storage. You can cut the foils to size in length at certain intervals. They have electric cables soldered to the positive and negative terminals, ready to plug into the power source. However, if you cut the foil into pieces, you will need to solder cables to all the new pieces. You can connect carbon heating foils in parallel, operated by only one thermostat (step 3). My table only has one heating foil, cut to size.
The power use of carbon heating foils - expressed in watts per square meter (W/m2) - varies because of two factors. First, heating foils are sold with different power outputs, mostly between 100 and 250 W/m2. Second, there’s size. If your 1m2 carbon foil reads 130 W/m2 and you cut it in half, then 0.5 square meters of heat foil will demand 65 watts. My table’s infrared heating film has a power use of 220W/m2. I first used 0.375 m2 of heating foil (50x70cm), resulting in a power use of about 82.5 watts. Then I cut off a centimeter to make it fit better under the table, and as a result power use dropped to roughly 75 watts.
You should only operate a carbon heating film with a thermostat. Without a thermostat, a heating foil could overheat and get damaged or cause fire. A thermostat also provides a stable comfort zone under the table. The thermostat turns the heater off when it reaches a set maximum temperature, and turns it back on when the temperature drops a few degrees lower.
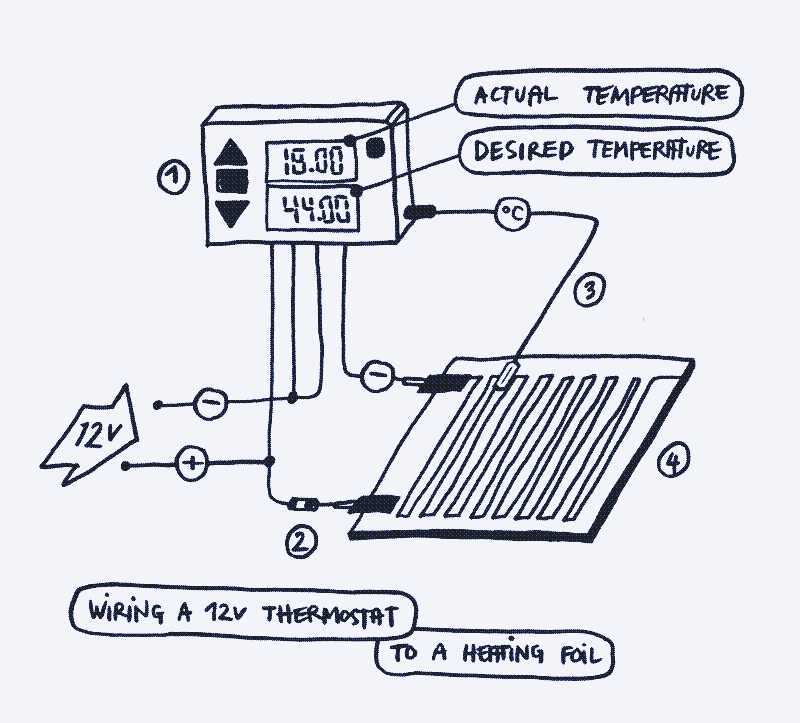
The thermostat voltage must match the heating film voltage: if you have a 12V heating foil, you need a 12V thermostat. If you have a 24V heating film, get a 24V thermostat. The thermostat I use for my table is the W3230 DC 12V. It’s a widely sold device for all kinds of purposes. You need to wire the thermostat and set the temperature.
The thermostat is connected between the heating foil and the power source, as shown in the illustration below. The wiring may be different for other thermostat models.
Your cables must be thick enough for the current that flows through them. Infrared heating foils are sold with thick electric cables included, and they are often much longer than you need them to be. You can cut them shorter and use the rest to wire the whole system. If you want to use other cables, then use a multimeter to measure the current that the heating film draws. For example, my 12V heat foil requires 6.6 Amps, so my cables - in the complete circuit - should have a conductor cross-section of at least 2.63 mm2 (that’s 13 AWG gauge, check this chart).
Any electrical system needs fuses for safety. Once you have cut your heating film to size, measure how much current runs through it. Next, install a fuse that is slightly above that value. My table uses 6.6 amps and I added an 8A fuse. Read more about fuses in our solar power manual.
You can add an off-on switch in your circuit to turn your heated table on and off. Use one that has a light indicator, so that you don’t forget to stop the heating system when you leave. You could also install a motion sensor under the table. That said, if you have wired your system correctly, used the right cable thickness, and added a fuse, leaving it on accidentally will not cause any safety problems.
The thermostat comes with a temperature sensor that you should install between the heating foil and the table (touching the heating foil). Make sure to fix this sensor securely, as it is essential to the proper and safe functioning of the heating system.
Before you start wiring the system, decide where your thermostat goes, because it will determine the length of the cables you need. I have my thermostat installed under the table, hidden under the blankets. Once programmed, there’s no need to access it regularly (see further). Having the thermostat on top of the table means that you need a hole in your blanket for all the cables to go through. It also complicates the adding and removing of blankets.
To program the thermostat, connect it to the power source. First, select the “heating” function. My thermostat’s default setting was “cooling” and I struggled to make it work at first. Here’s the steps to follow:
Next, you set the temperature at which you want the thermostat to turn the heat foil off. Heat foil manufacturers advise 40-45°C (104-113°F) during sustained use. Here’s what to do:
You can leave all other functions of the thermostat untouched.
To build a comfortable and energy-efficient heated table, you need to understand that a carbon heating film emits heat on both sides. If you simply attach it under a table it does not get warmer than 30°C, which will not improve thermal comfort in a significant way. It’s only when the heating surpasses skin temperature (around 35°C/95°F) and core body temperature (37°C/99°F) that you start feeling the warmth radiating towards you.
To reach sufficiently high temperatures, you need to cover one side of the heating foil with heat-insulating material.
To reach sufficiently high temperatures, you need to cover one side of the heating foil with heat-insulating material. That will force most of the heat output to the other side - the side that radiates energy towards your body. The carbon heat film for a heated table is placed below the tabletop, radiating heat downwards, and so the insulation goes on top. 3 It consists of the wood table top, one or more blankets, and any additional insulation material that you add to the table surface.
When carbon heating films are used as floor heating, the insulation is below. The upper side needs to be protected by a material that is strong and easily radiates heat, such as ceramic tile. However, when you build an electrically heated table with the foil radiating heat downwards, there’s no need to protect the exposed side. It can be touched safely and nobody is walking on it.
To improve the heat output of the infrared heating film, I have added 3 cm of cork insulation in the space between the foil and the table surface. I have not done any tests without the cork layer, but I am confident that the energy efficiency and thermal comfort of my table would not have been so excellent if it would not have been there. Other suitable natural insulation materials are wool, cellulose, wood fibers, hemp, and flax. You could also try radiator heat reflector foil.
If you put an electrically heated table on a cold floor, you will not be comfortable. The cold floor will suck up all the heat from the carbon heat foil, and your feet will conduct warmth to the floor. You need to insulate the floor, and you can do that with a wool carpet (or several wool carpets on top of each other). New wool carpets are expensive, but they don’t need to be much larger than the table and they can be found cheap second-hand. I got the very large Persian-style wool rug in my office for 50 euros, and I will add a second one on top to further improve the floor insulation.
The energy efficiency and thermal comfort of an electrically heated table are in large part determined by the type and size of the blankets you put over it. The blankets form part of the heat film insulation layer, but if they are long enough to reach the ground they also trap warm air under the table.
Radiant heating systems transfer energy to surfaces - including your body - and do not warm up the air directly. However, the air temperature under the table will slowly increase indirectly due to the higher surface temperatures of the blankets, the table, the carpet, and the person who sits at the table. During the experiments, the air temperature below my table at 25 cm above the floor increased by about 10°C (18°F).

Choose a wool blanket. Wool traps heat very efficienctly, is much more flame-resistant than other textile materials, doesn’t get dirty or smelly easily, regulates humidity, and purifies the air. 4 New wool blankets can be pricey at hundreds of euros for the size we need. However, I purchased four second-hand wool blankets for 90 euros, two of them large enough to reach the ground. If you find a wool blanket that is ugly or stained, simply layer it with a nicer and cheaper cotton blanket.
The size of the blanket you need depends on the size of your table (length, width, height). My table measures 80 cm long, 56 cm wide, and 75 cm high. That means that my blanket should measure at least 230 cm (75+80+75cm) x 206 cm (75+56+75cm) to reach the ground. Can’t find a blanket that is large enough? You could build a lower heated table and sit on the ground, or you could sew several smaller blankets together. Smaller blankets can also be useful in combination with larger blankets, or they can serve as the only blanket when it’s not so cold (see further).
Although it feels nice to work on a wool or cotton surface in winter, you can also put a wooden board on top of the blanket, cut to size, in order to protect the blanket from wear and dirt. Or, you drape a cotton tablecloth over the blanket, which is easier to wash than wool.
Any heating system must be able to be adjusted to achieve the desired comfort. For a central heating system, that happens by manipulating the thermostat. However, that doesn’t work so well for a heated table, because the temperature range of the carbon heating film is limited. Going below 38°C (100°F) will not provide a pleasant sensation of warmth, while prolonged heating above 45°C (113°F) may damage the heating film and make it too hot to touch. However, you can adjust thermal comfort in a wide range of air temperatures by “dressing” and “undressing” the table: by adding and removing textile layers, and by using them in different ways.
You can adjust thermal comfort in a wide range of air temperatures by adding and removing textile layers, and by using them in different ways
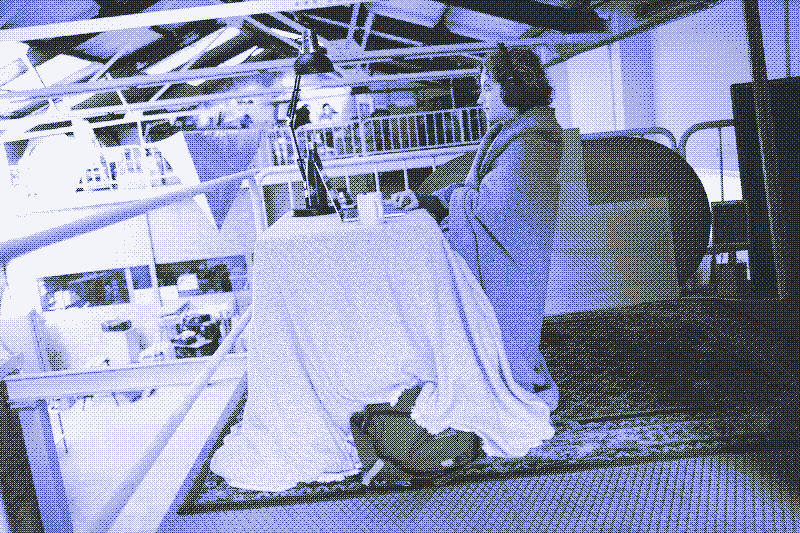
It’s not an exaggeration to say that the blanket becomes part of your clothing. Sitting at the table feels like wearing a very large dress that is heated from the inside. Just like we dress differently depending on the weather, adding and removing layers, the number of blankets, and how they are positioned can reflect the environmental conditions. I have tested the table with one to four blankets, and with every extra blanket energy efficiency and thermal comfort increase. On a very cold day, you could add two or three blankets hanging down the table. If you are still cold, you could drape extra blankets over your chair and shoulders. You could end up in a complete tent, heated from the inside, with just your head and arms sticking out.

However, as you add more blankets, the textile layer becomes increasingly heavy, and it takes more time to get in and out - to “dress” and “undress”. Consequently, a lighter cover is preferable if it provides sufficient comfort. On a chilly spring evening, one or two shorter blankets may be sufficient to keep you comfortable. I have tested the table like that and it did almost as good as with a large blanket. Energy use was somewhat higher and thermal comfort somewhat lower - I especially noted cold feet. However, should it be a bit warmer, I would prefer this setup because it’s more practical to get up from the desk.
Overheating can be solved without reaching for the thermostat as well: lift a corner of the carpet with your foot and let some heat escape, or remove one of the blankets. It would be more energy-efficient to turn down the thermostat, but the energy use of a heated table is already so low that there is room for some convenience. The comfort of a heated table can be further improved by a heated chair or bench, or by putting a screen behind your chair, covered with heat foil on one side and with insulation on the other side. That’s something for a future manual.
While an electrically heated table is much safer than a table heated by fire, it does entail some risks, including a fire. However, this can only happen when you ignore some crucial rules, which I repeat below:
Heated table: Kris De Decker.
Illustrations: Marie Verdeil.
Photos: Marina Kálcheva.
Model: Anita Filippova.
Photoshoot location: AkashaHub Barcelona. Thanks to Carmen Tanaka.
Marie Verdeil and Roel Roscam Abbing gave feedback on the draft of this article.
I did all tests at a maximum thermostat temperature of 44.5 degrees Celsius (112°F). Energy will be lower if you use a lower temperature setting. Apart from measuring energy use and temperatures, I noted my thermal comfort. I was sitting at the table wearing leather shoes, a thick layer of merino wool thermal underclothing, and thin work clothes above that. I did computer work. I did tests with an insulation of one to four blankets. The energy use and performance of your heated table may differ from mine. The energy use depends on the size and power of the heat source (step 2), the thermostat settings (step 4), the heat-insulating value of the blankets (step 8) and the carpet (step 7), the heat source insulation (step 6), and the table surface (step 1). As you add more heat insulation, the thermostat will turn off the heating source more often and for longer, resulting in lower energy use. The same happens when you set a lower maximum thermostat setting. ↩︎
Not accounting for the cost of a table or a carpet - things that are likely already around - you can build a one-person electrically heated table for less than 100 euros. Here are the costs for my table: 35 euros for the heating foil (I bought 2 meters for 75 euros and cut the roll to about half the size), 10 euros for the thermostat, 30 euros of cork insulation, and 40 euros for the second-hand “double” green wool blanket that is very large and thick. Total = 115 euros. I bought four other cheap second-hand blankets, all in an excellent state. You can spend hundreds or even thousands of euros on exquisite wool blankets if you have deep pockets. The costs (and the building time) increase as the table gets larger because there is more heating foil and insulation to add. ↩︎
Don’t make the mistake of putting the heat foil on the floor, radiating heat upwards to the table. Radiant heat sources don’t work by heating the air but by directly transmitting energy to your body. If energy radiates downwards, it will reach your thighs, knees, lower legs, and feet. In contrast, if the radiant energy comes from below, the bottom of the chair blocks most of it. Only your feet are directly exposed, but they will only be warmed when taking off your shoes. You also need to insulate the space below the heating foil and protect the top of the carbon heating film against damage, complicating the building process. ↩︎
Ingham, Peter, et al. “Wool and carpets-6000 years of innovation, quality and sustainability.” Key Engineering Materials 671 (2016): 490-496. See also: McNeil, Steve. “The thermal properties of wool carpets.” Technical Bulletin, AgResearch, NZ. AgResearch Limited Lincoln Research Centre| e Se||-Corner Springs Road & Gerald Street, Lincoln ita mīta i, mīta i het Private Bag 4749 (2016). ↩︎
https://solar.lowtechmagazine.com/2024/12/how-to-build-an-electrically-heated-table/